8.6 KiB
8.6 KiB
arduino esp32接入物联网通信云平台
本实践使用arduino平台esp32 wrover-b开发板连接上物联网通信云平台(UIoT Core),实现mqtt消息的发布与订阅
一、环境准备
1.下载并安装arduino IDE,点击选择下载方式
2.完成安装之后,打开IDE,安装ESP32包,步骤如下:
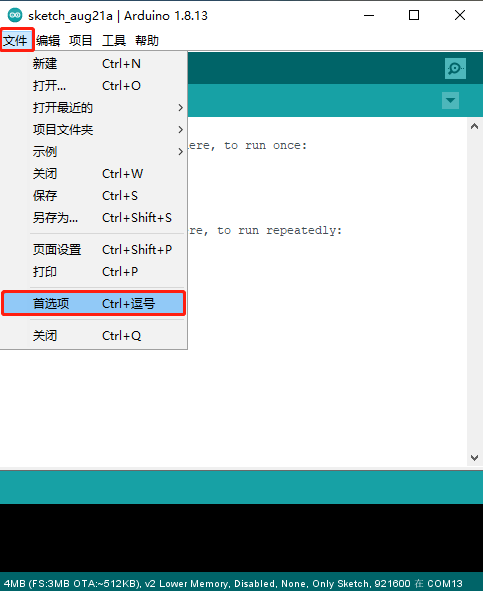
点击文件->首选项,弹出对话框
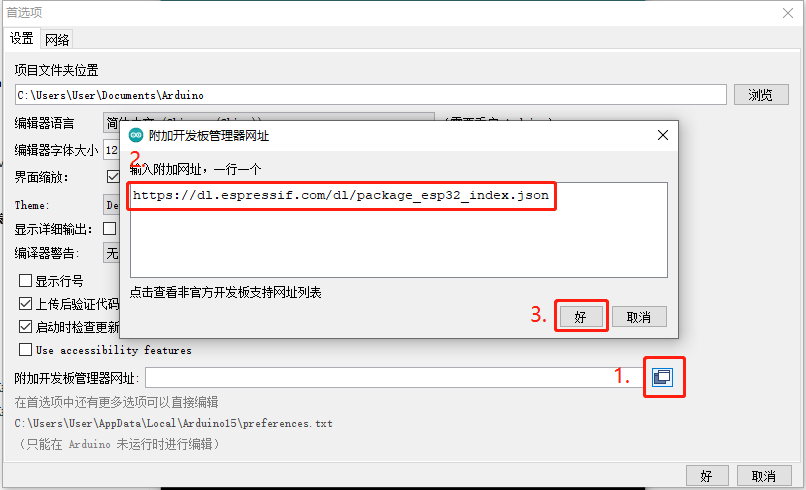
按如图所示,点击1处方框,将 https://dl.espressif.com/dl/package_esp32_index.json 填入,点击好,保存
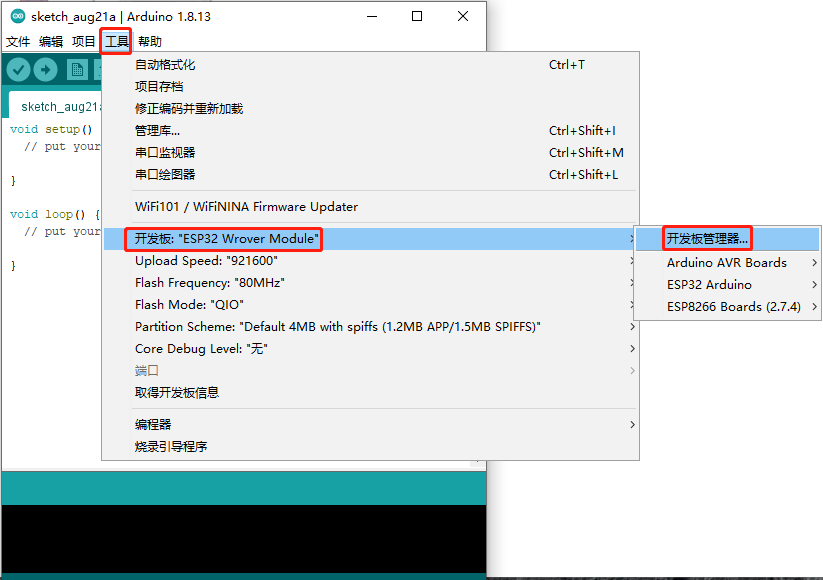
点击工具->开发板->开发板管理器,弹出对话框
等待下载完成之后,安装
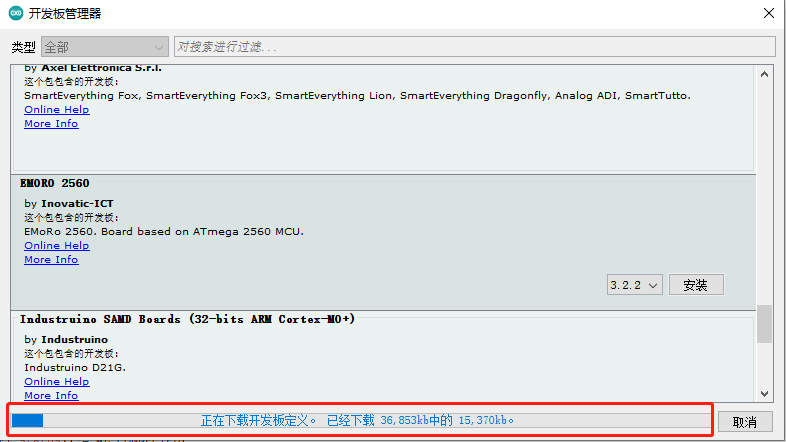
下载完成之后点击搜索框搜索esp32,点击安装,安装完成之后显示INSTALLED
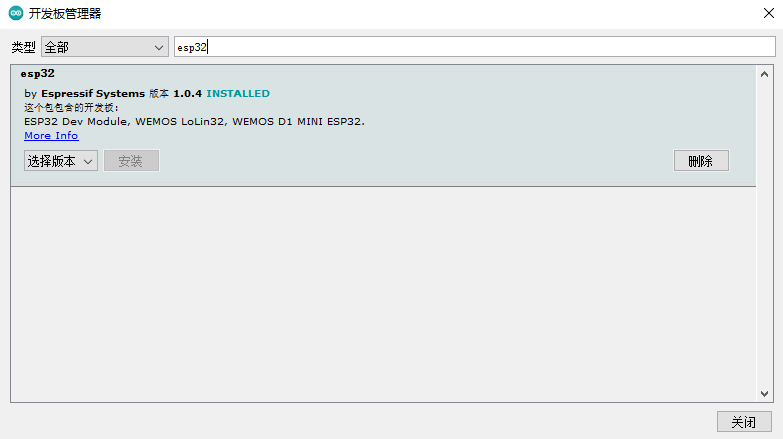
esp32开发板安装完成!
3.安装依赖库
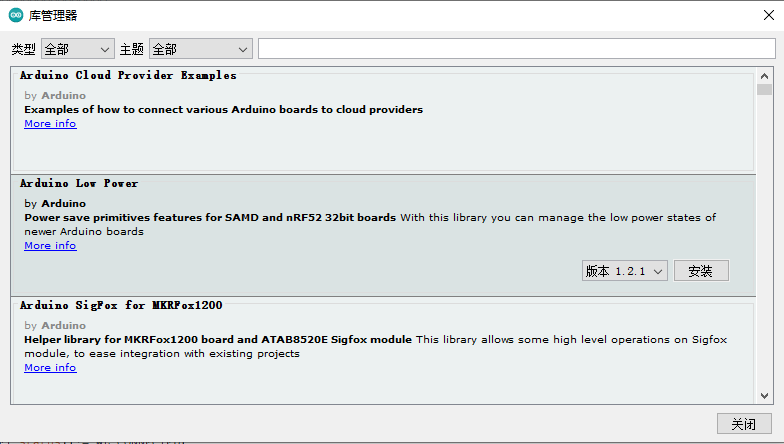
点击 工具->管理库,弹出对话框
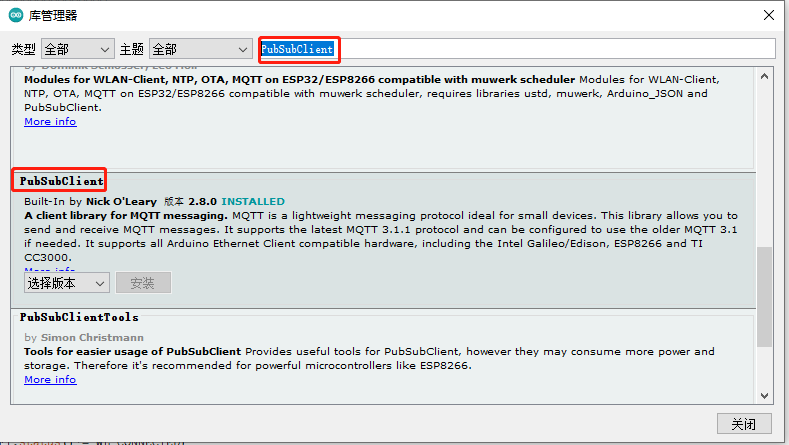
安装PubSubClient库,在搜索框中粘贴PubSubClient,找到该名称对应的库,并安装
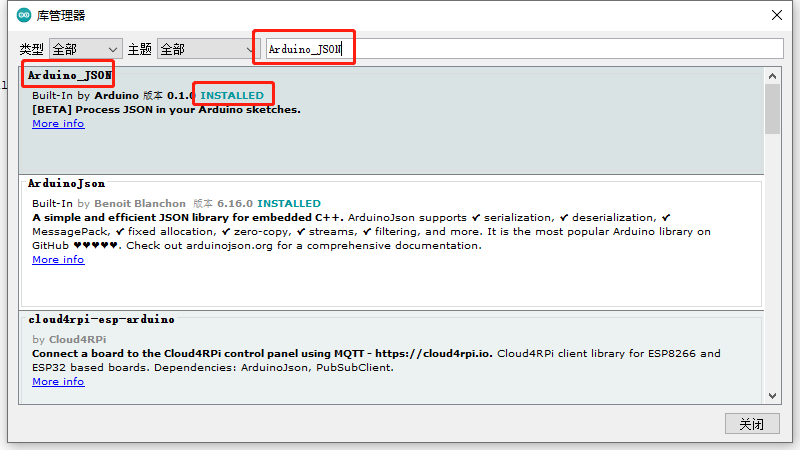
安装ArduinoJson库,在搜索框中粘贴Arduino_JSON,找到该名称对应的库,并安装
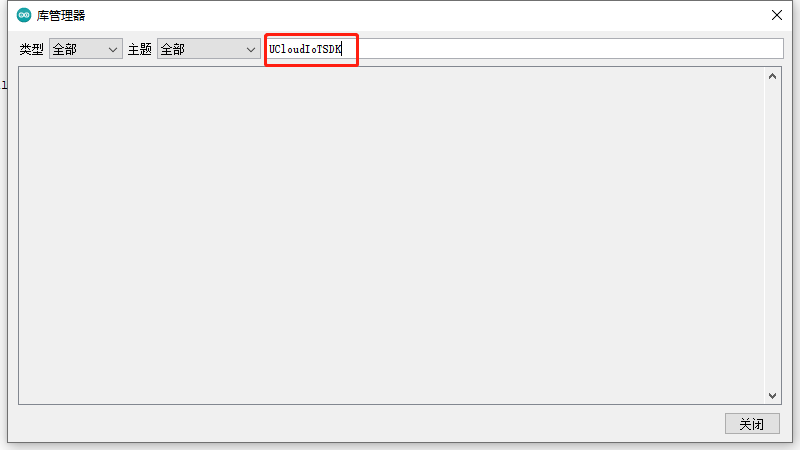
安装UCloudIoTSDK库,在搜索框中粘贴UCloudIoTSDK,找到该名称对应的库,并安装
4.开发板设置
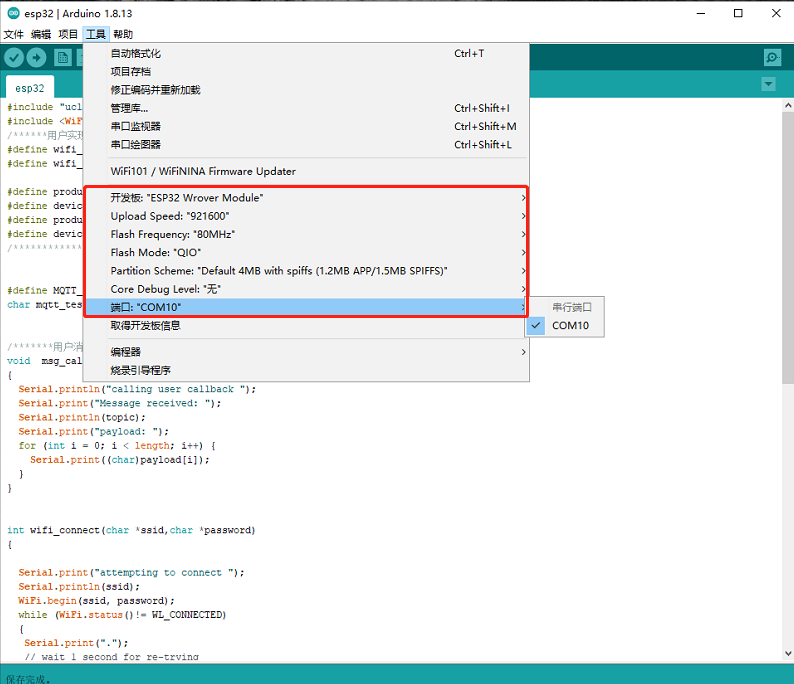
用USB--连接上开发板,将开发板信息设置为如图所示(该设置仅仅针对该款ESP32,其它请自行查阅资料确认如何设置)
二、程序编写
实现流程:
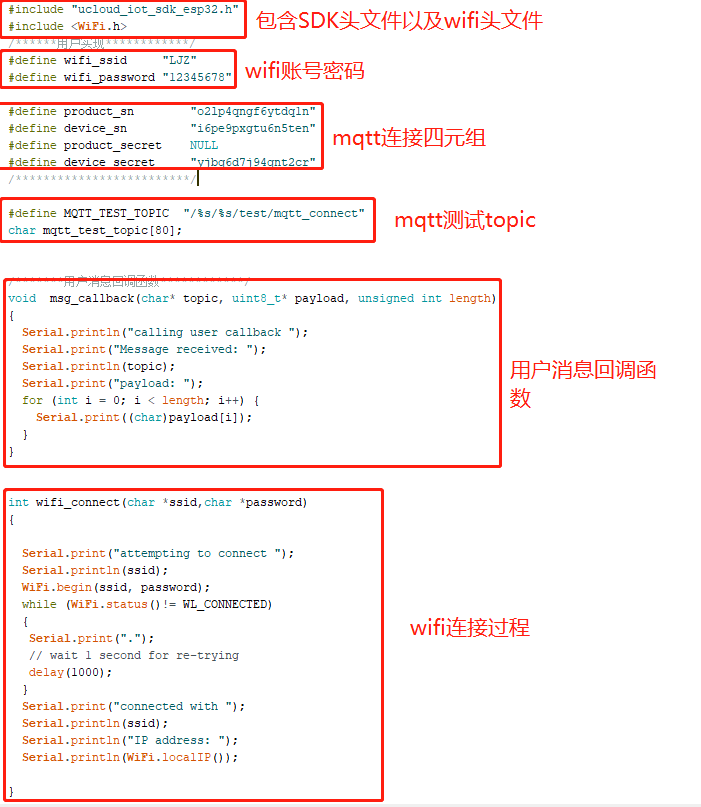
1.首先包含sdk头文件以及连接wifi所需头文件。
#include "UCloudIoTSDK.h"
#include <WiFi.h>
2.设置wifi ssid以及password。
#define wifi_ssid     ""
#define wifi_password ""
3.设置连接物联网通信平台需要的信息,该部分信息必须在物联网通信平台创建产品以及设备之后获得。product_sn 和device_sn必填。静态连接时,将product_secret置为NULL并填写device_secret。动态注册时将device_secret置为NULL并填写product_secret。
#define product_sn        ""
#define device_sn         ""
#define product_secret    ""
#define device_secret     ""
4.定义mqtt测试topic。
#define MQTT_TEST_TOPIC  "/%s/%s/test/mqtt_connect"
#define MQTT_TEST_MESSAGE  "This is a test message!"
char mqtt_test_topic[80];
5.设置用户消息回调函数,该回调函数在mqtt收到消息之后调用。
/*******用户消息回调函数************/
void  msg_callback(char* topic, uint8_t* payload, unsigned int length)
{
  Serial.println("calling user callback ");
  Serial.print("Message received: ");
  Serial.println(topic);
  Serial.print("payload: ");
  for (int i = 0; i < length; i++) {
    Serial.print((char)payload[i]);
  }
  Serial.println();
}
6.wifi连接过程
int wifi_connect(char *ssid,char *password)
{
  Serial.print("attempting to connect ");
  Serial.println(ssid);
  WiFi.begin(ssid, password);
  while (WiFi.status()!= WL_CONNECTED)
  {
   Serial.print(".");
   // wait 1 second for re-trying
   delay(1000);
  }
  Serial.print("connected with ");
  Serial.println(ssid);
  Serial.println("IP address: ");
  Serial.println(WiFi.localIP());
}
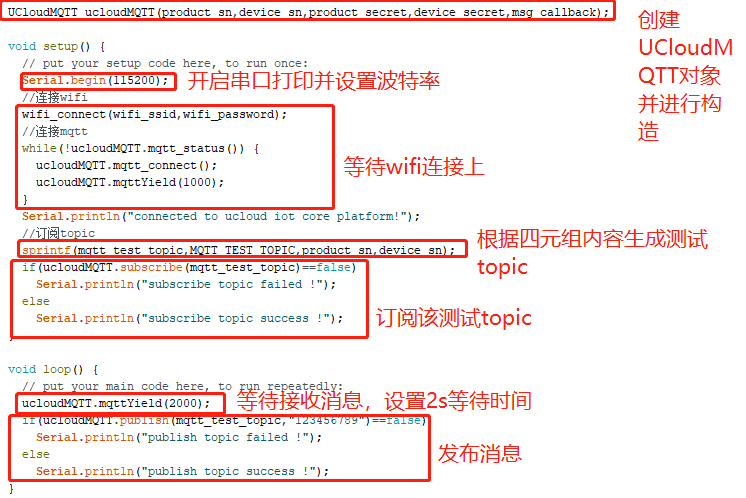
7.根据四元组信息以及回调函数构造UCloudMQTT对象
UCloudMQTT ucloudMQTT(product_sn,device_sn,product_secret,device_secret,msg_callback);
8.setup里面进行wifi连接以及mqtt连接,订阅测试topic
void setup() {
  // put your setup code here, to run once:
  Serial.begin(115200);
  //连接wifi
  wifi_connect(wifi_ssid,wifi_password);
  //连接mqtt
  while(!ucloudMQTT.mqtt_status()) {
    ucloudMQTT.mqtt_connect();
  }
  Serial.println("connected to ucloud iot core platform!");
  //订阅topic
  sprintf(mqtt_test_topic,MQTT_TEST_TOPIC,product_sn,device_sn);
  if(ucloudMQTT.subscribe(mqtt_test_topic)==false)
    Serial.println("subscribe topic failed !");
  else
    Serial.println("subscribe topic success !");
}
9.loop里面进行消息接收以及每两秒发布一条测试topic的消息
void loop() {
  // put your main code here, to run repeatedly:
  ucloudMQTT.mqttYield(2000);
  if(ucloudMQTT.publish(mqtt_test_topic,MQTT_TEST_MESSAGE)==false)
    Serial.println("publish topic failed !");
  else
    Serial.println("publish topic success !");
}
示例代码:
三、测试过程
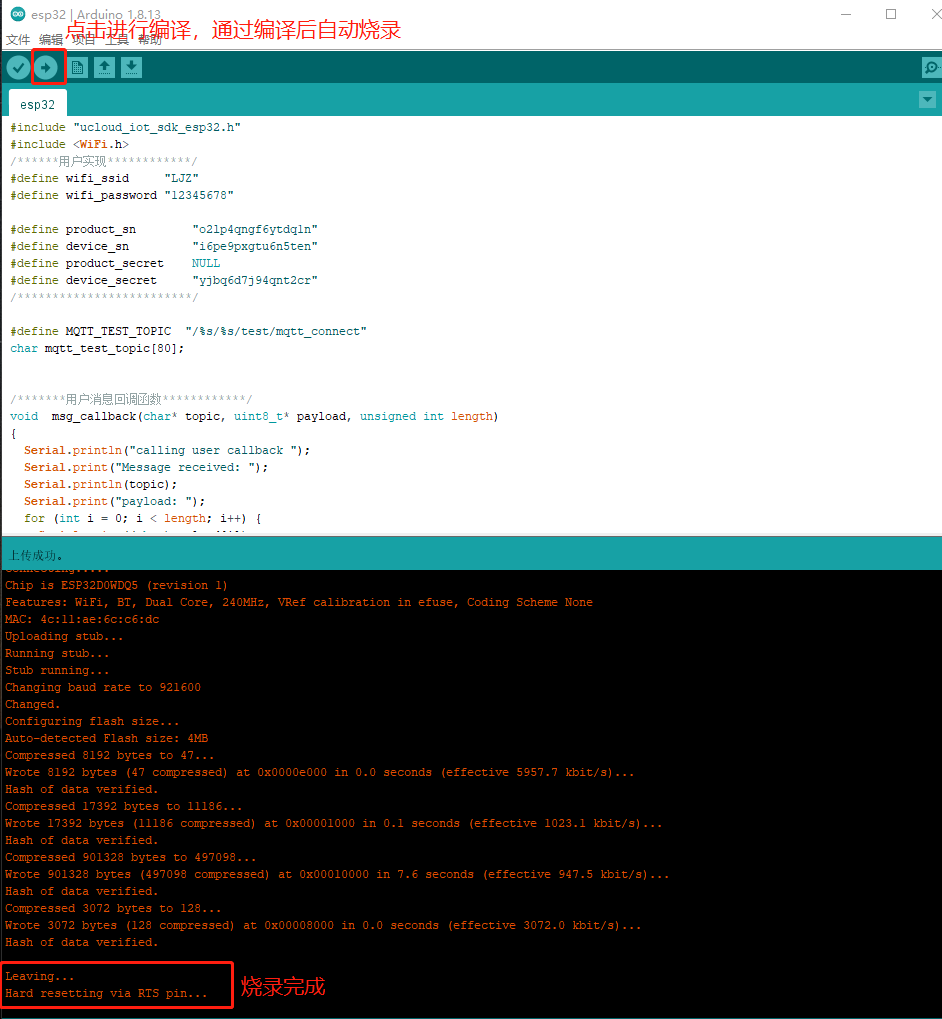
1.烧录
点击图中→方向,点击之后开始编译,编译通过后自动下载到开发板
2.设备端串口打印结果
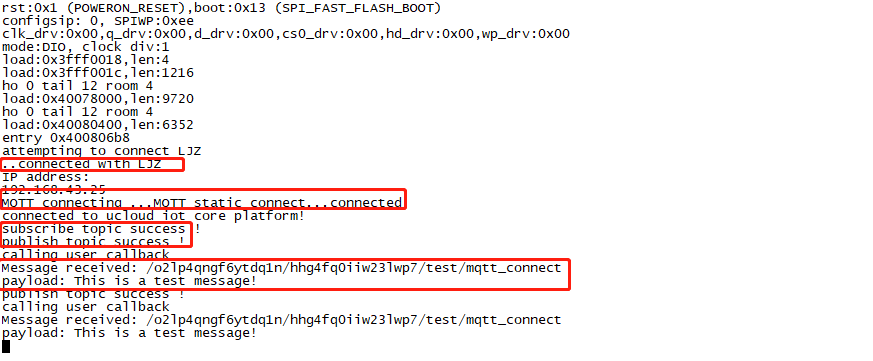
使用串口工具连接esp32串口,看到如图所示有wifi连接成功,mqtt连接成功。以及订阅发布成功的log。
3.物联网平台结果
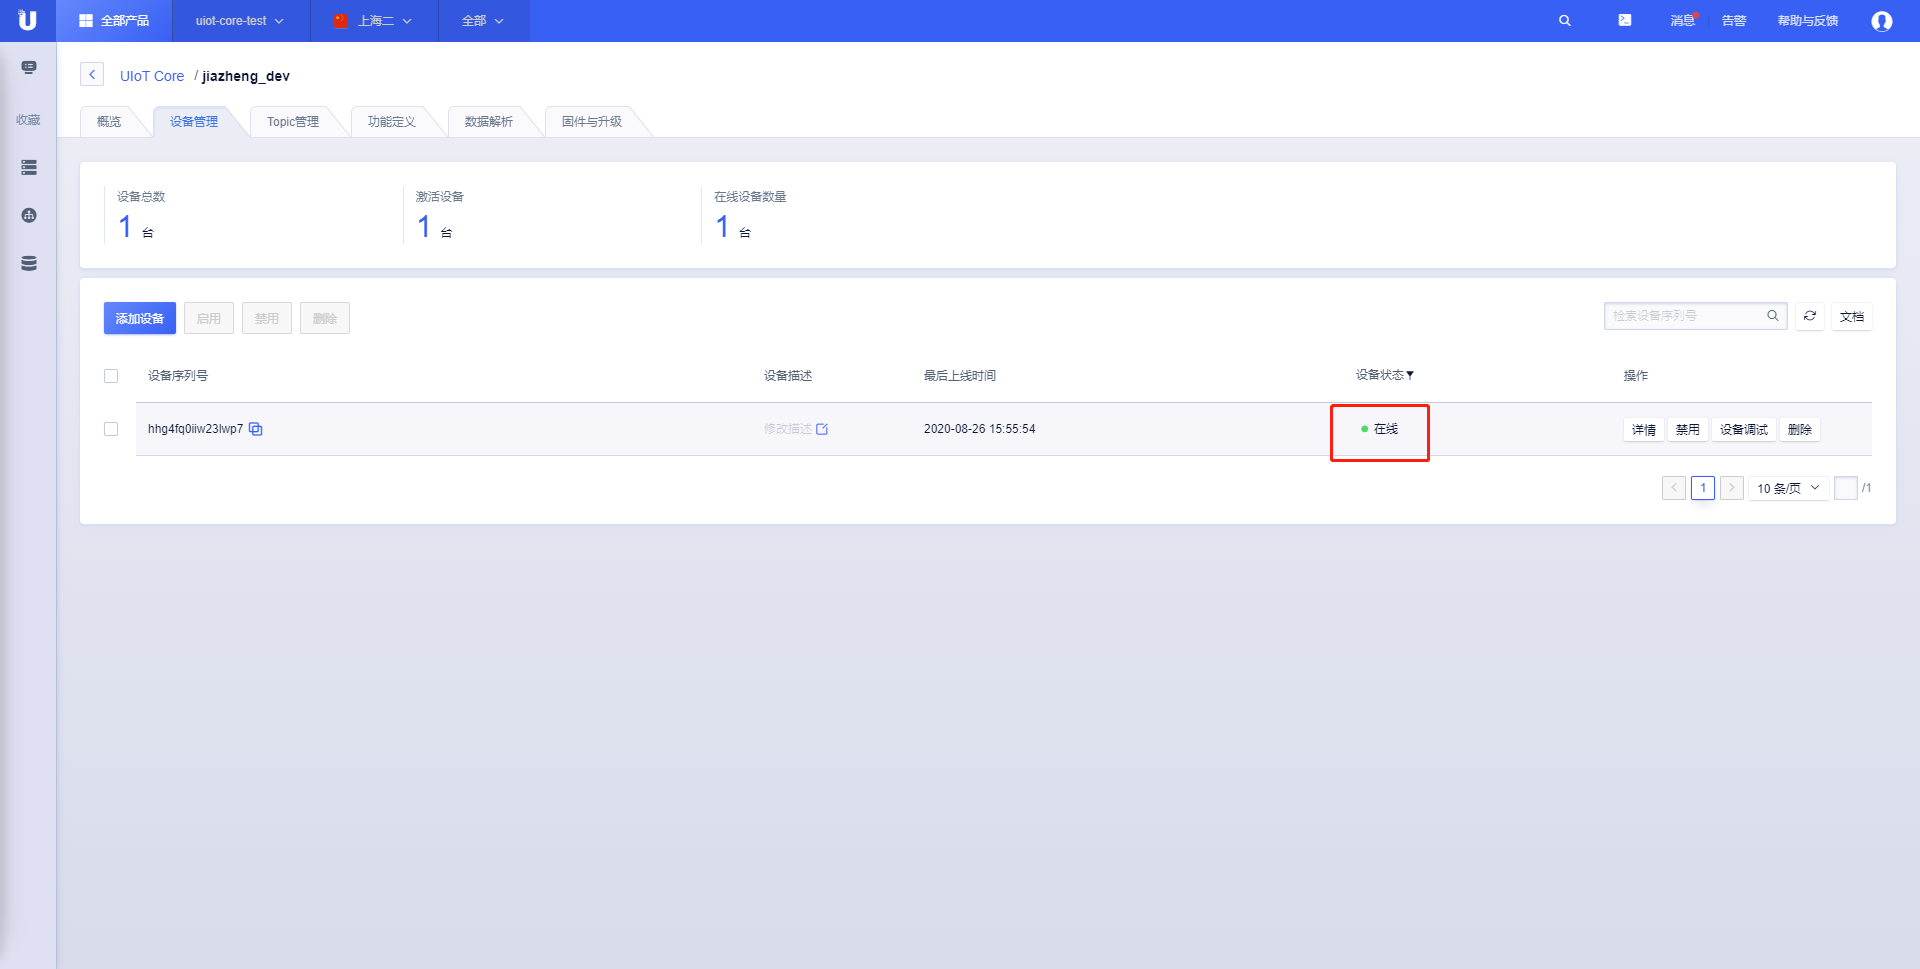
iot-core平台显示当前设备在线
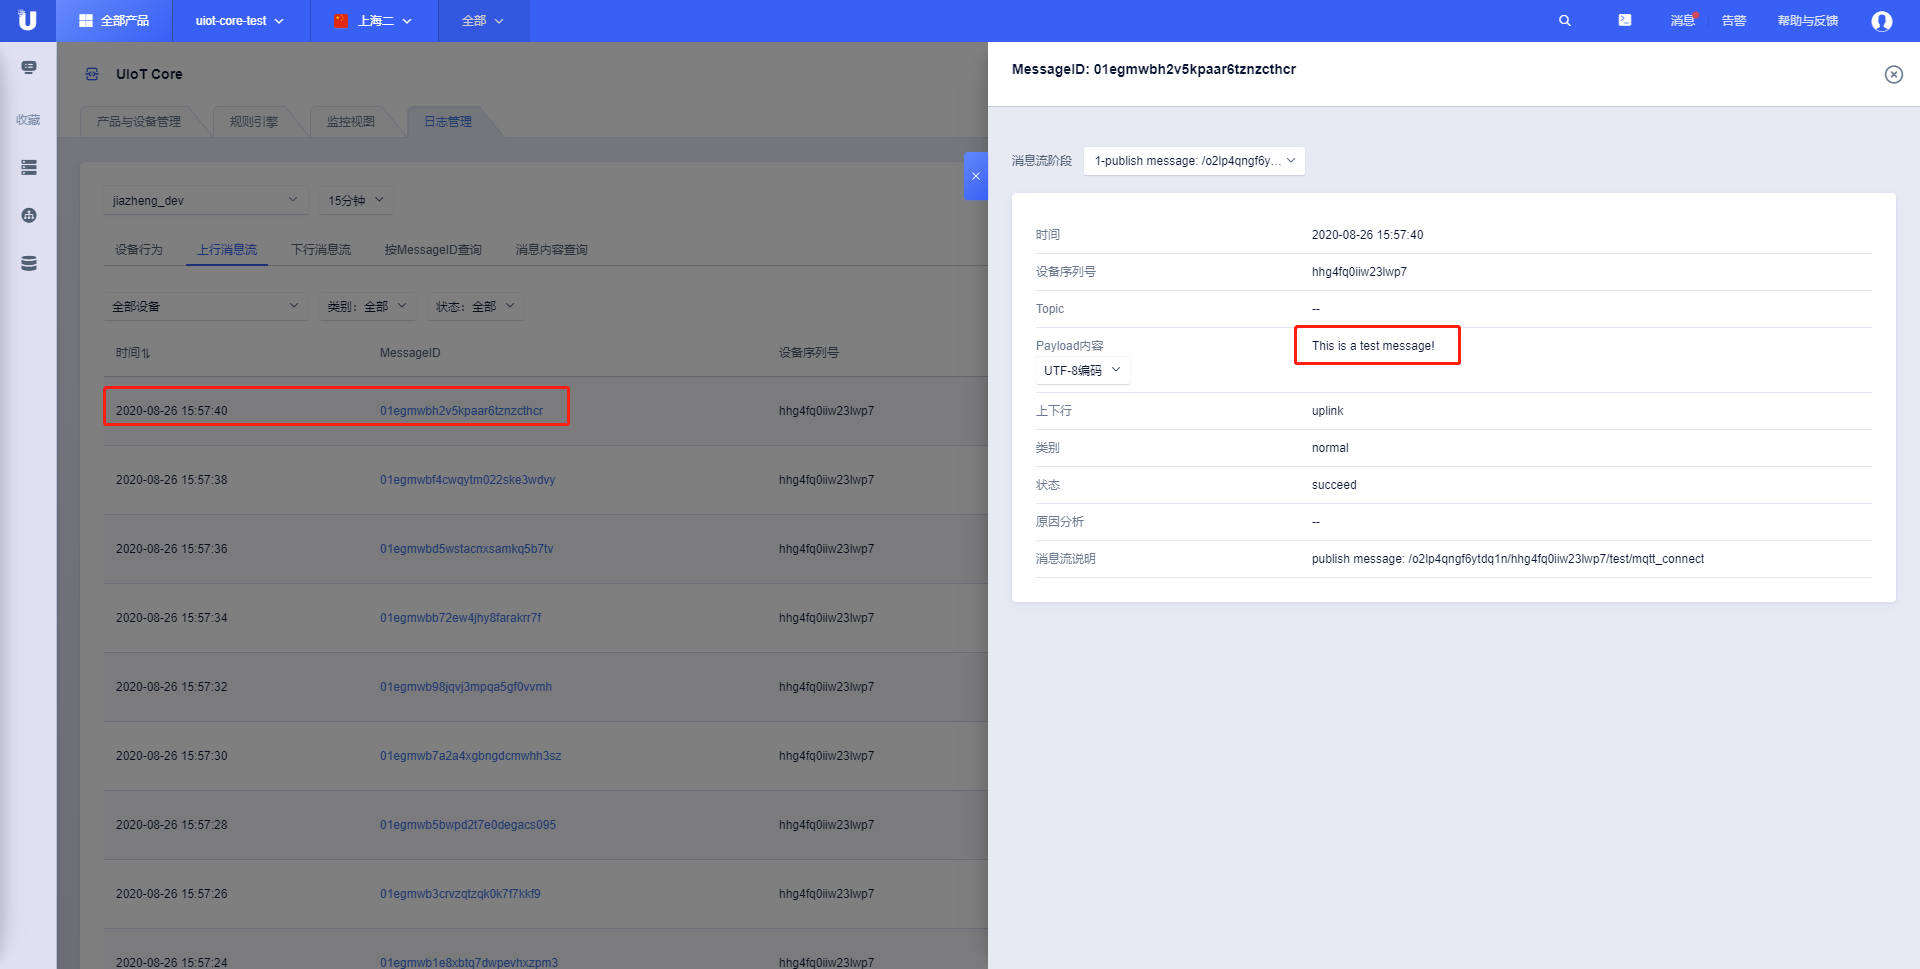
iot-core平台日志管理查看设备publish到云端的消息
四、拓展
该例程只演示了使用静态连接连上物联网通信云平台,此外SDK还有动态注册,以及TLS加密连接功能。想要使用动态注册只需要将四元组信息的device_sn置为NULL,并且正确填写四元组的其他三个信息。如果想要使用TLS加密连接,找到UCloudIoTSDK.h库文件,将ENABLE_ESP32_TLS注释取消即可打开TLS加密连接。
五、API参考
1.构造对象接口
要使用该库进行mqtt连接到物联网通信云平台时,需要首先构建UCloudMQTT对象,使用到以下接口:
UCloudMQTT(char *product_sn,char *device_sn,char *product_secret,char *device_secret,MQTTHandlerFun  callback);
参数:product_sn,指向存有产品序列号字符串的指针
参数:device_sn ,指向存有设备序列号字符串的指针
参数:product_secret,指向存有产品秘钥字符串的指针
参数:device_secret,指向存有设备秘钥字符串的指针
参数:callback,用户消息回调函数指针
使用示例:
UCloudMQTT ucloudMQTT(product_sn,device_sn,product_secret,device_secret,msg_callback);
2.MQTT连接接口
int mqtt_connect(void);
返回值: 0-连接成功  1-连接失败
使用示例:mqtt_connect();
3.延时等待接收MQTT消息接口
void mqttYield(int time_ms);
参数:time_ms,延时等待的时间,ms为单位。
使用示例:mqttYield(2000);
4.查询MQTT状态接口
boolean   mqtt_status(void);
返回值: true-处于连接状态  false-断开状态
使用示例:mqtt_status();
5.MQTT发布接口
boolean   publish(  const char* topic,  const char* payload  );
参数:topic,消息TOPIC
参数:payload,消息内容
返回值:true-发布成功  false-发布失败
使用示例:publish(MSG_TOPIC,"123456");

boolean   publish(const char* topic, const uint8_t * payload, unsigned int plength);
参数:topic,消息TOPIC
参数:payload,消息内容
参数:plength,payload的长度
返回值:true-发布成功  false-发布失败
使用示例:publish(MSG_TOPIC,"123456",6);
6.MQTT订阅接口
boolean   subscribe(const char* topic);
参数:topic,订阅的TOPIC
返回值:true-订阅成功  false-订阅失败
使用示例:subscribe(MSG_TOPIC);

boolean   subscribe(const char* topic, uint8_t qos);
参数:topic,订阅的TOPIC
参数:qos,消息服务质量等级,仅支持qos0和qos1,
返回值:true-订阅成功  false-订阅失败
使用示例:subscribe(MSG_TOPIC,1);
7.MQTT取消订阅接口
boolean   unsubscribe(const char* topic);
参数:topic,订阅的TOPIC
返回值:true-订阅成功  false-订阅失败
使用示例:unsubscribe(MSG_TOPIC);